Is your refrigerator humming louder than a beehive and struggling to keep your groceries cool, all while spiking your energy bills? Dirty condenser coils often lurk as the silent saboteur, accumulating dust, pet hair, and grime that forces your fridge to work overtime. As an appliance repair expert with years of hands-on experience, we see this issue daily—homeowners overlook this simple maintenance, leading to inefficient cooling and premature breakdowns. Cleaning your refrigerator condenser coils restores peak performance, slashes energy costs by up to 20%, and extends your appliance’s lifespan, turning a potential headache into a quick win.
In this comprehensive guide, we dive into how to clean refrigerator coils safely and effectively, whether they’re tucked underneath or on the back of your unit. We cover essential steps, tools like coil brushes and shop vacuums, and tips for various models, including side-by-side refrigerators. Backed by insights from top sources, this DIY approach empowers you to tackle dirty condenser coils without professional help—though if damage persists, our team stands ready to assist. Get ready to boost efficiency and say goodbye to those warm shelves.
What Are Refrigerator Condenser Coils and Why Do They Matter?
Refrigerator condenser coils play a crucial role in your appliance’s cooling system. These coils act as heat-dissipating components, releasing the heat absorbed from inside the fridge. The compressor pumps refrigerant through the coils, where it condenses from a gas to a liquid, expelling warmth to keep your food cold. Over time, dirty condenser coils in a refrigerator accumulate dust, pet hair, and grime, forcing the system to work harder and reducing overall efficiency.
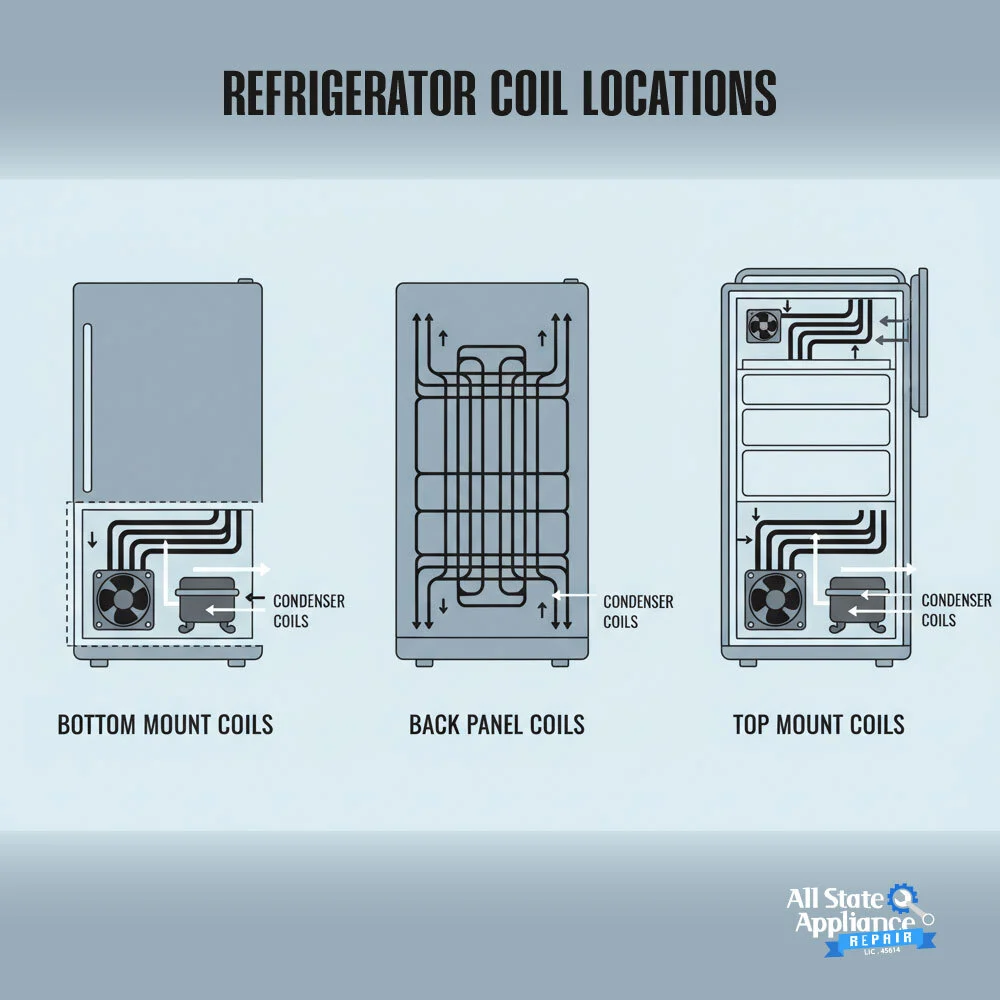
Refrigerator Coils Location
Condenser coils typically sit in one of three spots, depending on your model. Most modern refrigerators hide them at the bottom, behind the base grille or kick plate for easy access. Others position them on the back, exposed or behind a panel. Some older or top-freezer models place them on top. Check your owner’s manual—brands like Whirlpool and GE often specify these locations to guide safe cleaning.
Symptoms of Dirty Fridge Coils
Dirty fridge coils show clear warning signs that impact performance. Your refrigerator might run constantly but fail to cool properly, leading to warmer interiors and spoiled food. Noisy operation, such as louder humming or buzzing from the compressor, often signals restricted airflow. Higher energy bills creep up as the unit overworks to compensate. Sources like Asurion and Wirecutter highlight these issues, noting that dust buildup blocks heat release, causing inefficiency.
Benefits of Cleaning Condenser Coils
Regular cleaning delivers significant advantages. You can achieve energy savings of 10-20% by reducing the fridge’s workload, translating to lower utility bills—potentially $5-10 monthly, per user experiences on Reddit. It extends the appliance’s life by easing strain on the compressor and improves cooling performance for consistent temperatures. Clean coils prevent problems like food freezing unevenly, as noted by Energy.gov, promoting better efficiency and environmental impact.
How Often Should You Clean Refrigerator Condenser Coils?
Maintaining clean condenser coils keeps your refrigerator running smoothly, but how often to clean refrigerator condenser coils depends on your household. As a general rule, aim to clean them every six months. This routine prevents dust and debris from building up, ensuring optimal efficiency and avoiding unnecessary strain on the system.
However, certain factors call for more frequent attention. In homes with pets, where pet hair accumulates quickly, or in dusty environments like those near construction or with poor air filtration, clean the coils every two to three months. Greasy kitchens from frequent cooking can also accelerate grime buildup, leading to dirty condenser coils that hinder performance. Watch for signs like increased noise or warmer interiors to gauge if it’s time sooner. By staying proactive, you reduce energy waste and prolong your fridge’s life—simply unplug, access the coils, and give them a quick brush or vacuum. Regular checks turn this task into a habit that pays off in cooler operation and lower bills.
Tools and Materials Needed for Refrigerator Coil Cleaning
| Tool/Entity | Description | Why Use It |
| Coil brush | Soft-bristled for gentle dusting | Prevents fin damage |
| Shop vacuum | With brush attachment | Sucks up loose dust |
| Compressed air | For hard-to-reach spots | Alternative to brush |
| Screwdriver | For panels | Removes base grille |
| Coil cleaning solution (e.g., vinegar-water mix) | Mild cleaner | Grease removal |
| Gloves/Mask | Safety gear | Protects from dust |
Step-by-Step Guide: How to Clean Refrigerator Condenser Coils
Regularly cleaning your refrigerator coils is one of the easiest ways to boost energy efficiency, prevent breakdowns, and extend your appliance’s lifespan. Follow these six simple steps to tackle this task like a pro:
Unplug the Fridge
- Safety comes first when tackling how to clean condenser coils in a refrigerator—always unplug the unit from the wall outlet to avoid electrical shocks while accessing dirty condenser coils.
- If your model has a power switch or circuit breaker, disconnect it completely to ensure no current flows during refrigerator condenser cleaning.
- Double-check that the fridge is off by listening for silence from the compressor, preventing accidents with live wires near the condenser coils.
Pro Tip: Label the plug with tape to remind household members not to reconnect it mid-cleaning.
Move the Refrigerator for Access
Refrigerator coils are typically in one of two places:
- Gently pull the refrigerator away from the wall if coils are on the back, creating enough space—about 2-3 feet—to reach underneath coils or rear panels without straining.
- For bottom-mounted condenser coils, no full move is needed, but ensure stability by enlisting help to avoid tipping, especially with heavy side-by-side refrigerator models.
- Clear surrounding areas of obstacles like rugs or debris that could contribute to dust buildup on coils under the refrigerator.
Pro Tip: Use furniture sliders under the fridge legs for easier movement and to protect your floors.
Locate the Coils
- Identify refrigerator coils location: most are underneath behind a base grille, while others sit on the back or rarely on top in older units.
- Consult your owner’s manual for specifics on condenser coils placement, as dirty condenser coils in a refrigerator can hide in vents or panels.
- Inspect visually for signs of grime, pet hair, or dust on the fridge condenser to confirm you’re targeting the right area for cleaning refrigerator condenser.
Pro Tip: Take a photo of the setup before starting for easy reference during reassembly.
Remove the Base Grille or Back Panel
- Unscrew or unclip the kick plate at the front bottom for under-refrigerator access, exposing coils under refrigerator for thorough cleaning.
- For rear coils, remove screws from the back panel using a screwdriver, carefully setting it aside to reveal the condenser and fan area.
- Handle components gently to avoid bending fins on the condenser coils, which could worsen efficiency issues from dirty condenser coils.
Pro Tip: Keep screws in a small container to prevent loss during this refrigerator coil cleaning step.
Vacuum Loose Debris
- Attach a brush nozzle to your shop vacuum and gently suck up loose dust, pet hair, and debris from the condenser coils without pressing too hard.
- Work in sections, starting from the top down, to dislodge and remove buildup that causes inefficient cooling in dirty condenser coils refrigerator scenarios.
- Use compressed air as an alternative for hard-to-reach spots if wondering can I use compressed air to clean refrigerator coils—short bursts clear without brushing.
Pro Tip: Empty the vacuum canister beforehand to maintain strong suction for effective refrigerator condenser cleaning.
Brush Stubborn Dirt
- Employ a soft coil brush to gently sweep away caked-on grime from the fins, focusing on how to clean refrigerator coils without brush alternatives if unavailable.
- Move the brush in the direction of the coil fins to avoid damage, targeting stubborn dirt that vacuuming missed on the fridge condenser.
- For greasy residues in kitchen environments, lightly dampen the brush with a mild coil cleaning solution like vinegar-water mix for better results.
Pro Tip: Rotate the brush slowly to lift dirt without flattening the delicate condenser coil structure.
Wipe Down the Area
- Use a soft, dry cloth or slightly damp microfiber rag to wipe remaining residue from the coils and surrounding areas, ensuring no moisture lingers near electrical parts.
- Avoid soaking the area, as excess water can lead to rust or short circuits when cleaning condenser coil refrigerator components.
- Inspect for any missed spots on dirty condenser coils, giving a final pass to promote better airflow and efficiency post-cleaning.
Pro Tip: If using a solution, test it on a small area first to prevent discoloration or damage.
Reassemble the Panels
- Securely replace the base grille or back panel by aligning clips or screws, ensuring everything fits snugly to protect coils from future dust buildup.
- Double-check connections and remove any tools or debris from the area before finalizing this step in how to clean the condenser coils on a refrigerator.
- Wiggle components gently to confirm stability, preventing vibrations that could loosen parts over time.
Pro Tip: Clean the grille itself with soapy water before reattaching for an extra layer of maintenance.
Restore Power & Monitor
- Plug the refrigerator back in and listen for the compressor to start, indicating successful power restoration after cleaning refrigerator coils under the refrigerator.
- Allow 1-2 hours for the unit to cool down, monitoring temperatures to ensure improved efficiency from clean condenser coils.
- Track energy usage or noise levels over the next few days to confirm the benefits of refrigerator condenser cleaning, addressing any persistent issues promptly.
Pro Tip: Set a calendar reminder for your next cleaning to maintain peak performance year-round.
Prevention Tips
Keeping your refrigerator condenser coils free from dust and debris not only boosts efficiency but also minimizes the need for frequent deep cleans. By focusing on proactive measures, you can prevent dust buildup on coils, reduce strain on the compressor, and maintain optimal refrigerant flow. These strategies address common culprits like pet hair, kitchen grease, and airborne particles, ensuring your fridge condenser stays in top shape for better performance and lower energy bills.
- Position Your Refrigerator Strategically: Place the unit away from high-traffic areas, windows, or vents that circulate dust, helping to prevent dust buildup on coils under the refrigerator. This simple relocation reduces exposure to dirty condenser coils triggers like construction debris or outdoor pollutants, promoting longer intervals between refrigerator condenser cleaning sessions.
- Maintain Clean Surrounding Floors: Regularly vacuum or mop the area around and under the fridge to eliminate loose pet hair and grime before it reaches the condenser coils. Using a HEPA-filter vacuum captures fine particles, directly tackling dirty condenser coils in a refrigerator and enhancing overall airflow for sustained efficiency.
- Install Protective Filters or Guards: Add removable mesh filters over intake vents or base grilles to block pet hair and dust from settling on fridge condenser components. These affordable additions make cleaning refrigerator coils easier by catching debris early, avoiding the symptoms of dirty fridge coils like noisy operation.
- Control Household Air Quality: Use air purifiers or dehumidifiers in the kitchen to lower airborne contaminants that contribute to dirty condenser coils. This tip is especially useful in greasy environments, where it prevents buildup on coils under refrigerator models, leading to fewer instances of inefficient cooling.
- Schedule Routine Visual Inspections: Every month, quickly check the coils for early signs of dirt using a flashlight, allowing you to address minor issues before they escalate into full-blown dirty condenser coils refrigerator problems. Pair this with gentle brushing if needed, reinforcing habits that extend your appliance’s life and optimize energy use.
Common Questions About Cleaning Refrigerator Coils
Can I use compressed air to clean refrigerator coils
Yes, you can use compressed air to clean refrigerator coils effectively, especially for light dust buildup on dirty condenser coils. Hold the canister upright and use short bursts from about 6 inches away to blow away debris without damaging the fins. This method works well for how to clean refrigerator coils without brush, reaching tight spots under the fridge condenser. Always unplug the unit first for safety, and wear a mask to avoid inhaling particles. For heavier grime, combine with vacuuming for thorough refrigerator condenser cleaning. This quick approach prevents efficiency loss from dirty condenser coils in a refrigerator, taking just minutes.
What are the symptoms of dirty fridge coils?
Symptoms of dirty fridge coils include inefficient cooling, where your refrigerator struggles to maintain low temperatures, leading to warmer shelves and potential food spoilage. You might notice noisier operation as the compressor works harder, or higher energy bills from increased power use. Frost buildup in the freezer or uneven cooling are common too, signaling blocked airflow from dust and pet hair on dirty condenser coils. If ignored, these issues escalate, causing the fridge condenser to overheat. Regular checks during refrigerator condenser cleaning can spot these early, restoring performance and preventing costly repairs.
What is the best tool to clean refrigerator coils?
The best tool to clean refrigerator coils is a soft coil brush, designed to gently remove stubborn dirt without bending the delicate fins on the condenser coils. Pair it with a shop vacuum for sucking up loose debris like pet hair and dust from coils under refrigerator models. For alternatives, compressed air cans work for light cleaning, avoiding brushes altogether. Essential refrigerator coil cleaning tools also include screwdrivers for panel removal and gloves for safety. This combo ensures effective cleaning refrigerator coils under refrigerator, boosting efficiency and reducing strain on the compressor for longer appliance life.
What happens if you don’t clean refrigerator coils?
If you don’t clean refrigerator coils, dust and grime accumulate on dirty condenser coils, forcing the compressor to work harder and reducing cooling efficiency. This leads to higher energy bills, warmer interior temperatures, and potential food spoilage. Over time, the strain can cause premature breakdowns, like compressor failure, shortening your fridge’s lifespan. Noisy operation and uneven cooling are early signs of dirty condenser coils in a refrigerator. Neglecting refrigerator condenser cleaning also increases fire risks from overheating. Regular maintenance prevents these issues, saving money and ensuring reliable performance.
Do I need to turn off the fridge before cleaning coils?
Yes, you need to turn off the fridge before cleaning coils to ensure safety and avoid electrical hazards. Unplug the unit from the wall or switch off the circuit breaker to disconnect power completely. This step is crucial when accessing condenser coils, as it prevents shocks while vacuuming or brushing dirty condenser coils. For models with a power switch, use that too. After cleaning refrigerator condenser, wait a few minutes before restoring power to let components settle. This simple precaution makes DIY refrigerator coil cleaning risk-free and effective.
Can I clean my own refrigerator coils?
Absolutely, you can clean your own refrigerator coils as a straightforward DIY task that boosts efficiency. Start by unplugging the unit, locating the coils—often underneath or on the back—and using a coil brush or vacuum to remove dust from dirty condenser coils. No special skills are needed, just basic tools like a screwdriver for panels. It’s safe for most homeowners, saving on professional fees while preventing issues from dirty condenser coils in a refrigerator. If coils are damaged or hard to access, consider calling experts. Regular refrigerator condenser cleaning keeps your appliance running smoothly.
Can you use a wet rag to clean refrigerator coils?
You can use a wet rag to clean refrigerator coils, but with caution to avoid excess moisture that could cause rust or electrical issues. Dampen a soft cloth lightly with water or a mild solution, then wring it out thoroughly before wiping dirty condenser coils. This works for greasy buildup on fridge condenser areas, but dry methods like brushing are safer for routine cleaning. Always unplug first and ensure the area dries completely before powering on. For how to clean condenser coil refrigerator without water risks, opt for compressed air or vacuuming to maintain efficiency.
Can I use a shop vac to clean refrigerator condenser coils?
Yes, you can use a shop vac to clean refrigerator condenser coils effectively, as it’s great for sucking up loose dust, pet hair, and debris from dirty condenser coils. Attach a brush nozzle for gentle contact, working in sections to avoid damaging fins. This tool excels in how to clean coils under a refrigerator, especially in tight spaces. Unplug the unit first for safety. For best results, follow with a coil brush for stubborn spots. Regular use during refrigerator condenser cleaning prevents efficiency drops and extends appliance life.
Is it safe to clean coils myself?
It is safe to clean coils yourself if you follow proper steps, like unplugging the refrigerator first to eliminate electrical risks. Use gentle tools such as a coil brush or vacuum on dirty condenser coils to avoid bending fins or causing damage. Wear gloves and a mask for protection from dust. Most homeowners handle this DIY refrigerator coil cleaning without issues, improving efficiency from dirty condenser coils in a refrigerator. However, if your model has complex access or you’re unsure, professional help ensures safety. Always consult your manual for specifics.
How long does it take for a refrigerator to cool after cleaning coils?
It typically takes 1-2 hours for a refrigerator to cool after cleaning coils, though full stabilization might require up to 24 hours. Once you restore power post-refrigerator condenser cleaning, the compressor restarts, and clean condenser coils allow efficient heat dissipation. Factors like room temperature and initial warmth affect speed—avoid opening doors frequently. Monitor for consistent cooling to confirm success in addressing dirty condenser coils. If it doesn’t cool properly, check for other issues like refrigerant levels. This quick recovery highlights the benefits of regular coil maintenance.
How to unclog a condenser coil without removing it?
To unclog a condenser coil without removing it, start by unplugging the fridge and accessing the coils via the base grille or back panel. Use compressed air in short bursts to blow out clogs from dust or pet hair on dirty condenser coils. Alternatively, a shop vacuum with a brush attachment sucks debris effectively. For greasy blockages, apply a mild coil cleaning solution with a spray bottle, then brush gently. Avoid water near electrical parts. This method restores airflow in how to clean condenser coils under refrigerator, improving efficiency without disassembly.
What is the best coil cleaning solution?
The best coil cleaning solution is a simple mix of equal parts water and white vinegar, which cuts through grease and grime on dirty condenser coils without harsh chemicals. Spray lightly, let it sit for 5-10 minutes, then brush or wipe away residue. For tougher buildup, add a drop of dish soap. This eco-friendly option is safe for refrigerator condenser cleaning, preventing corrosion. Always rinse with a damp cloth and dry thoroughly before powering on. It beats commercial sprays for cost and availability, ensuring clean coils under refrigerator for better performance.
How do I prevent dust buildup on coils?
To prevent dust buildup on coils, position your refrigerator away from dusty areas and use air purifiers to reduce airborne particles. Vacuum floors around the unit weekly to catch pet hair before it reaches dirty condenser coils. Install mesh filters over vents for extra protection. Keep kitchen grease in check with exhaust fans. Schedule monthly visual checks during routine maintenance. These steps minimize the need for frequent refrigerator condenser cleaning, maintaining efficiency and avoiding symptoms like higher bills from clogged fridge condenser.
What happens if you don’t clean your refrigerator coils?
If you don’t clean your refrigerator coils, accumulated dust on dirty condenser coils hampers heat release, making the compressor overwork and spike energy costs. Cooling becomes inefficient, leading to warmer interiors, food spoilage, and noisy operation. Long-term, it risks compressor failure and shortens appliance life. Dirty condenser coils in a refrigerator can also pose fire hazards from overheating. Preventive refrigerator coil cleaning averts these problems, ensuring reliable performance and savings.
What is the best coil cleaning solution?
The best coil cleaning solution is a simple mix of equal parts water and white vinegar, which cuts through grease and grime on dirty condenser coils without harsh chemicals. Spray lightly, let it sit for 5-10 minutes, then brush or wipe away residue. For tougher buildup, add a drop of dish soap. This eco-friendly option is safe for refrigerator condenser cleaning, preventing corrosion. Always rinse with a damp cloth and dry thoroughly before powering on. It beats commercial sprays for cost and availability, ensuring clean coils under refrigerator for better performance.
What are the symptoms of a blocked condenser coil on a refrigerator?
Symptoms of a blocked condenser coil on a refrigerator include poor cooling efficiency, with the interior not reaching desired temperatures despite constant running. The compressor may produce unusual noises like buzzing or clicking from overexertion. Rising energy bills signal increased power draw due to dirty condenser coils blocking airflow. You might see frost in odd spots or smell burning from overheating. These issues from dust and pet hair on fridge condenser worsen over time, but timely refrigerator condenser cleaning resolves them.
Can you spray vinegar on condenser coils?
Yes, you can spray vinegar on condenser coils as a safe, natural cleaner for removing grease and grime from dirty condenser coils. Mix it with water (1:1 ratio) in a spray bottle, apply lightly, and let it dwell for a few minutes before brushing. This method avoids harsh chemicals, making it ideal for refrigerator condenser cleaning. Rinse with a damp cloth and ensure dryness before reconnecting power. It’s effective for how to clean condenser coil refrigerator without damage, improving airflow and efficiency.
Conclusion
Cleaning your refrigerator condenser coils regularly transforms efficiency, slashing energy bills by 10-20% while preventing noisy operation and breakdowns from dirty condenser coils. This simple DIY task—unplugging, vacuuming, and brushing—ensures optimal cooling and extends appliance life, tackling dust buildup on coils under refrigerator models effortlessly.
If issues persist or coils show damage, don’t risk further problems. Contact our appliance repair experts for professional service—schedule via our contact form today for reliable, efficient fixes. Keep your fridge running smoothly!
When to call a professional
While cleaning refrigerator coils is a straightforward task, some issues demand expert attention. If you notice bent or rusted coils, hear unusual buzzing or grinding noises, or your fridge still struggles to cool after cleaning, it’s time to call in the pros. Damaged coils can leak refrigerant, while a persistently warm fridge might signal a failing compressor or electrical malfunction—issues that worsen (and get costlier!) if ignored. Similarly, if your coils are tucked behind sealed panels or require disassembling parts, DIY attempts could void warranties or cause accidental damage. At All State Appliance Repair, we’ve seen it all: from shredded pet hair clogging bottom coils to corroded condensers triggering emergency breakdowns. Our licensed technicians diagnose hidden problems in minutes, using specialized tools like coil fin combs and HVAC-grade vacuums to restore efficiency without risking your safety.
Don’t gamble with your fridge’s health—or your peace of mind.
🔧 Schedule a Professional Coil Cleaning Today
➔ Call us at 415-566-2255 for same-day refrigerator repair.