To defrost your refrigerator’s freezer compartment or standalone freezer is not just a maintenance task—it’s a vital step to ensure optimal performance, energy efficiency, and food safety. Frost buildup can reduce storage space, make your appliance work harder, and even lead to costly repairs if left unchecked. Whether you’re dealing with a chest freezer, upright freezer, or a fridge-freezer combo, this comprehensive guide will walk you through how to defrost a freezer in 4 simple steps, along with expert tips, safety precautions, and insights to prevent future frost buildup.
By following this guide, you’ll not only restore your freezer to peak performance but also extend its lifespan and save on energy bills. Plus, we’ll cover when to call a professional for freezer repair and answer common FAQs to make the process as smooth as possible. Let’s dive in!
Why Defrosting Your Freezer Matters
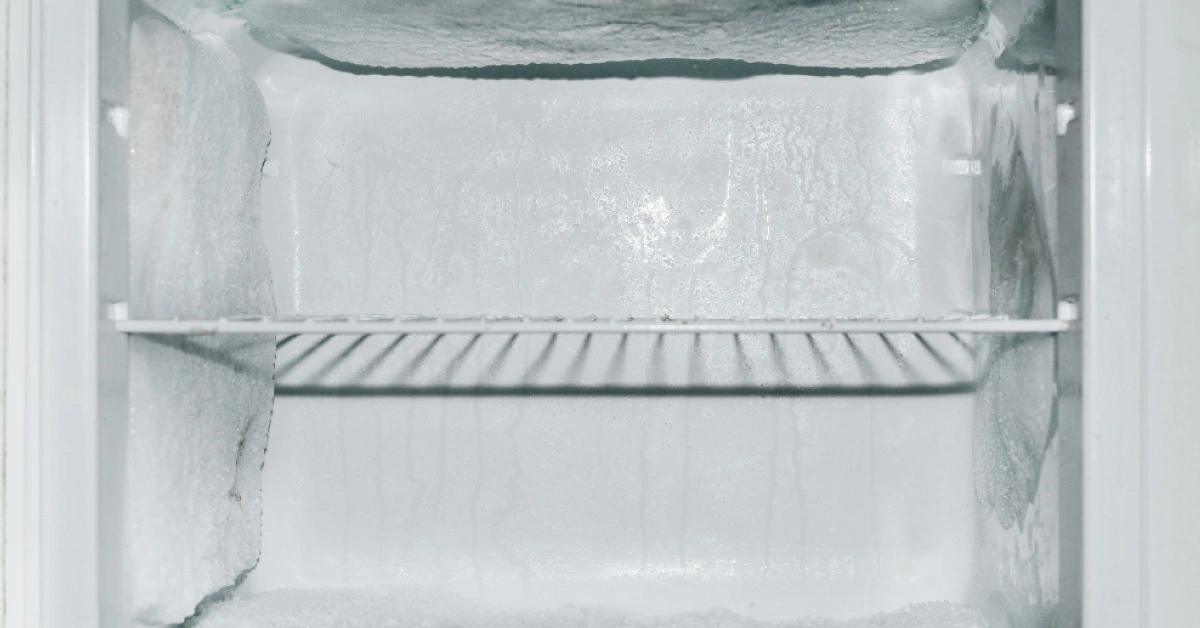
Frost buildup in a freezer isn’t just an eyesore—it’s a problem that affects efficiency and functionality. Here’s why defrosting is essential:
- Improves Energy Efficiency: Frost acts as an insulator, forcing your freezer to work harder to maintain low temperatures, which increases energy consumption. Regular defrosting can lower your utility bills.
- Maximizes Storage Space: Ice buildup takes up valuable space, limiting how much food you can store.
- Prevents Food Spoilage: Excessive frost can block air vents or cover temperature sensors, leading to uneven cooling and potential food spoilage.
- Extends Appliance Lifespan: By reducing strain on the compressor and other components, defrosting helps avoid premature wear and tear, saving you from costly freezer repair down the line.
Experts recommend defrosting your freezer at least once a year or when frost buildup reaches 1/4 to 1/2 inch thick. High humidity or frequent door openings may require more frequent defrosting. If your freezer has an auto-defrost feature, you may still need to manually defrost occasionally if frost accumulates excessively.
How to Defrost Your Freezer in 4 Easy Steps
Defrosting a freezer doesn’t have to be a daunting task. With the right preparation and tools, you can complete the process efficiently. Here’s a step-by-step guide to defrost your freezer like a pro.
Step 1: Prepare Your Freezer and Food
What You’ll Need:
- Cooler or insulated bags
- Ice packs or frozen gel packs
- Towels or rags
- Plastic liners or baking sheets
- A bucket or basin (if your freezer has a drainage hose)
Instructions:
- Plan Ahead: Choose a time when your freezer inventory is low to minimize food handling. Planning your defrost around a grocery shopping or meal prep day can help.
- Turn Off the Freezer: Unplug the appliance or set the temperature control to “off” to stop the cooling cycle. This prevents energy waste and ensures safety during the process.
- Remove Food: Transfer all food to a cooler or insulated bags with ice packs to keep items frozen. Wrap delicate items like meat or ice cream in blankets or newspaper for extra insulation. If it’s a cold day, you can place food in a secure container outside to stay frozen.
- Protect Your Floor: Lay towels, old rags, or plastic liners on the floor in front of the freezer to catch melting water. If your freezer has a drainage hose, position a bucket or basin to collect water.
Pro Tip: Before transferring food, set your freezer to its coldest setting for 6 hours to ensure items stay frozen longer during the defrosting process.
Step 2: Melt the Ice
What You’ll Need:
- A fan (optional)
- Pans of hot water (optional)
- Plastic scraper or spatula
- Towels or rags for mopping up water
Instructions:
- Let It Melt Naturally: The safest method is to leave the freezer door open and allow the ice to melt on its own. This can take 2–24 hours, depending on the frost buildup.
- Speed Up the Process (Optional):
- Use a Fan: Position a fan to blow room-temperature air into the open freezer. This circulates warm air and accelerates melting.
- Hot Water Method: Place pans of hot (not boiling) water inside the freezer with the door open. The steam will help loosen the ice. Replace the water as it cools.
- Hairdryer (with Caution): Use a hairdryer on its lowest setting, keeping it at a safe distance to avoid water damage or electrical hazards.
- Remove Loose Ice: As the ice softens, gently use a plastic scraper or spatula to remove chunks. Avoid sharp or metal tools, as they can damage the freezer’s interior.
- Mop Up Water: Use towels or rags to soak up water as the ice melts. If your freezer has a drainage hose, ensure it’s directing water into a bucket. You can tilt the freezer slightly by placing shims under the front legs to aid drainage.
Safety Note: Never use sharp objects or excessive force to chip away ice, as this can damage the freezer’s coils or walls, leading to costly repairs. If you’re unsure about the process, consider contacting a professional for freezer repair.
Step 3: Clean and Dry the Freezer
What You’ll Need:
- Mild dish soap
- Warm water
- Baking soda (optional)
- Clean towels or cloths
- Sponge or soft cloth
Instructions:
- Clean the Interior: Mix mild dish soap with warm water or create a solution of one part baking soda to four parts water to tackle odors. Use a sponge or soft cloth to wipe down the walls, shelves, and door seals.
- Address Odors: For stubborn smells, the baking soda solution is highly effective. Avoid harsh chemicals like bleach, as they can damage the freezer or leave residues that affect food safety.
- Dry Thoroughly: Use clean towels to dry the interior completely. Any residual water can refreeze and create new ice buildup.
- Clean the Drainage Hose (if applicable): If your freezer has a drainage hose, ensure it’s clear of debris to prevent clogs during future defrosting.
Pro Tip: Take this opportunity to clean the freezer’s exterior and check the door seals for cracks or dirt. A clean seal ensures proper insulation and prevents frost buildup.
Step 4: Restart and Restock
What You’ll Need:
- Your frozen food
- Labels and markers (optional for organization)
Instructions:
- Plug It Back In: Restore power to the freezer and set the temperature to the recommended setting (usually 0°F or -18°C).
- Wait for Cooling: Allow the freezer to reach its optimal temperature before restocking (this may take 1–2 hours).
- Organize Food: Return food to the freezer, placing older items at the front for easy access. Consider labeling items with freeze dates to track freshness.
- Monitor Performance: Check the freezer over the next few days to ensure it’s maintaining the correct temperature and there’s no new frost buildup.
Pro Tip: Avoid overpacking the freezer, as this can block airflow and lead to uneven cooling. Leave some space for air circulation to maintain efficiency.
Tips to Prevent Frost Buildup
Preventing frost buildup can reduce the frequency of defrosting and keep your freezer running smoothly. Here are some actionable tips:
- Check Door Seals: Ensure the door gasket is clean and intact. A damaged seal allows warm, humid air to enter, causing frost. If you notice issues, schedule a freezer repair to replace the gasket.
- Cool Food Before Freezing: Always cool hot food to room temperature before placing it in the freezer to minimize moisture buildup.
- Use No-Frost Technology: Consider upgrading to a no-frost freezer, which circulates cool air to prevent moisture buildup, eliminating the need for manual defrosting.
- Minimize Door Openings: Limit how often and how long you open the freezer door to reduce humidity exposure.
- Use Freezer-Safe Containers: Store food in airtight, freezer-safe bags or containers to prevent moisture release. The water displacement method (sealing a zipper-lock bag while submerging it in water to remove air) can help.
- Monitor Temperature: Keep your freezer at 0°F (-18°C). A temperature that’s too high or too low can cause frost buildup.
When to Call a Professional
While defrosting is a straightforward task, some situations require expert intervention. Contact a professional for freezer repair if:
- Frost Builds Up Rapidly: If frost returns quickly after defrosting, there may be an issue with the door seal, thermostat, or cooling system.
- Freezer Isn’t Cooling Properly: If the freezer doesn’t reach the correct temperature after defrosting, the compressor or thermostat may need repair.
- Unusual Noises: Humming, buzzing, or clicking sounds could indicate a mechanical issue that requires professional diagnosis.
- Damaged Components: If you accidentally damage the freezer’s coils, walls, or drainage system during defrosting, a technician can assess and fix the issue.
- Auto-Defrost Malfunction: If your auto-defrost freezer is accumulating excessive frost, the defrost heater or timer may be faulty.
For reliable service, contact a certified technician to diagnose and resolve complex freezer issues, ensuring your appliance runs efficiently.
Additional Tips for Freezer Maintenance
Beyond defrosting, regular maintenance can keep your freezer in top shape:
- Clean Condenser Coils: Dust and dirt on condenser coils (usually at the back or bottom of the freezer) can reduce efficiency. Clean them every 6–12 months with a vacuum or brush.
- Check Air Vents: Ensure vents inside the freezer are clear of food or debris to maintain proper airflow.
- Inspect the Thermostat: If the freezer isn’t maintaining a consistent temperature, test the thermostat settings or have it professionally checked.
- Organize for Efficiency: Use baskets or dividers to organize food, making it easier to access items without leaving the door open for too long.
FAQs About Defrosting a Freezer
1. How often should I defrost my freezer?
Defrost your freezer at least once a year or when frost buildup reaches 1/4 to 1/2 inch thick. High humidity or frequent door openings may require more frequent defrosting.
2. Can I defrost my freezer without removing food?
It’s best to remove food to ensure thorough defrosting and cleaning. Leaving food inside can lead to spoilage if the freezer warms up during the process.
3. How long does it take to defrost a freezer?
Defrosting can take 2–24 hours, depending on the frost buildup and method used. Using a fan or hot water can speed up the process to a few hours.
4. Is it safe to use a hairdryer to defrost my freezer?
Yes, but use it on the lowest setting and keep it at a safe distance to avoid water damage or electrical hazards. Never let water contact the hairdryer.
5. Can I refreeze food after defrosting the freezer?
Yes, as long as the food remained below 40°F (4°C) during the process (e.g., stored in a cooler with ice packs). Refreezing food that has thawed in the fridge is safe.
6. Why does my freezer keep frosting up quickly?
Rapid frost buildup could indicate a damaged door seal, frequent door openings, or high humidity. If the issue persists, consult a professional for freezer repair.
7. Do no-frost freezers need defrosting?
No-frost freezers typically don’t require manual defrosting, as they prevent frost buildup with air circulation. However, excessive frost may indicate a malfunction needing professional attention.
8. Can I use a metal scraper to remove ice?
No, metal scrapers can damage the freezer’s interior, including coils or walls. Use a plastic scraper or spatula instead.
9. How can I tell if my freezer needs defrosting?
If frost is 1/4 inch thick or more, or if you notice reduced storage space, higher energy bills, or uneven cooling, it’s time to defrost.
10. What should I do with freezer-burned food found during defrosting?
Freezer-burned food is safe to eat but may have poor texture or flavor. Consider using it in cooked dishes like soups or stews, or discard it if it’s past its prime.
Conclusion
Defrosting your freezer is a simple yet essential task to maintain its efficiency, save energy, and protect your food. By following these 4 easy steps—preparing your freezer, melting the ice, cleaning and drying, and restocking—you can keep your appliance in top condition. Incorporate our prevention tips to reduce frost buildup and extend your freezer’s lifespan. For persistent issues or complex problems, don’t hesitate to seek professional freezer repair to ensure your appliance runs smoothly.
With this guide, you’re equipped to tackle defrosting like a pro. Have any tips or questions about freezer maintenance? Share them in the comments below, and happy defrosting!